Manage Agile requirements
Azure DevOps Services | Azure DevOps Server 2022 - Azure DevOps Server 2019
In this article, learn the key concepts and tasks associated with managing project requirements with Agile tools and features in Azure DevOps.
Tip
Requirements management is a continuous process throughout a project lifecycle—encompassing the processes of documenting, analyzing, prioritizing, tracking, and collaborating with stakeholders to agree on work to be performed. A single requirement corresponds to a capability which a project outcome—product, service, architecture, performance—should conform.
Capture requirements
Use work items to capture requirements. Each work item has a type, which depends on the process you choose. You can also create a custom work item type.
Note
Requirements specify expectations of users for a software product. In Azure Boards, requirements are defined by work items that appear on your product backlog. Based on the process selected for your project, requirements correspond to User Story (Agile), Product backlog item (Scrum), Issue (Basic), or Requirement (CMMI) work item types. They also belong to the Requirements category, which manages the work item types that appear on the product backlog.
Work item types
Work items let you capture different information and workflows. Each work item has a type, which depends on the process you choose. You can use these default work item types for requirements and defects:
- Agile: User Story and Bug
- Basic: Issue and Bug
- Scrum: Product Backlog Item and Bug
- CMMI: Requirement and Bug
You can customize each process for your Azure DevOps project. You can also decide how to track bugs for each team.
Default work item types
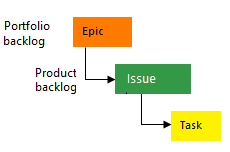
The following image shows the hierarchy for the Agile process backlog work item:

- User Stories and tasks are used to track work.
- Bugs track code defects.
- Epics and features are used to group work under larger scenarios.
Each team can configure how they manage Bug work items at the same level as User Story or Task work items. Use the Working with bugs setting. For more information about using these work item types, see Agile process.


Customize work item types
You can customize the following aspects of work item types:
- Add custom fields and workflow states
- Add custom rules that support business workflow processes
- Add custom portfolio backlogs and customize backlogs and boards
- Add custom controls to work item forms to gain enhanced functionality
Add work items to the product backlog or board
To capture requirements, start by adding a Title to the product backlog. You can add more details later as needed.
Capture requirements on the product backlog
Adding a Title to the product backlog helps you quickly capture and organize requirements and allows you to prioritize and refine them over time.

Work item fields
Each work item tracks data in fields, captures changes in the History field, and comments in the Discussion section.
Use work items to:
- Add information, update status, assign to team members, link work items, and attach files
- Assign work to a timebox or sprint
- Quickly fill in fields using templates
- Contribute to a queryable discussion thread
- Prioritize and triage work items
Development and Deployment sections support end-to-end traceability:
- Create a new branch or pull request from a work item
- Complete the pull request
- Perform a squash merge
- Create a branch for several work items
- Link a work item to existing development and build objects
- View release stages associated with the work item in real time
- View the status of releases associated with commits in build and release pipelines
Import and update requirements using Excel
You can use a .csv file or Excel spreadsheet to import and update your requirements. These tools let you work with a flat list or a tree of work items. For example, you can define a tree of Epics, Features, and User Stories in Excel and then import them to Azure DevOps.
Import requirements from Excel

Functional and nonfunctional requirements
Work items help you track any work that you or your team need to do. You can use the same work item type for both functional and nonfunctional requirements:
- Functional requirements: Describe what your product or service should do.
- Nonfunctional requirements: Describe how your product or service should operate.
Categorize your requirements using the following elements:
- Tags
- Business Value field
- Custom fields
Maintain requirement specifications
Some requirements need more details than what you can put in a work item. Use Azure DevOps to store and manage your requirements in an Azure Repos repository or a project wiki.
You can link or attach your specifications to your requirements.
Analyze and prioritize requirements
Use Azure Boards tools to prioritize and refine your backlog, ensuring your requirements are clear and well-defined:
- Product backlog: Drag and drop work items to reorder by priority. Edit multiple work items at once to change assignments or update fields.
- Query Results, Triage mode: Review and quickly update work items and add details.
Group and organize requirements
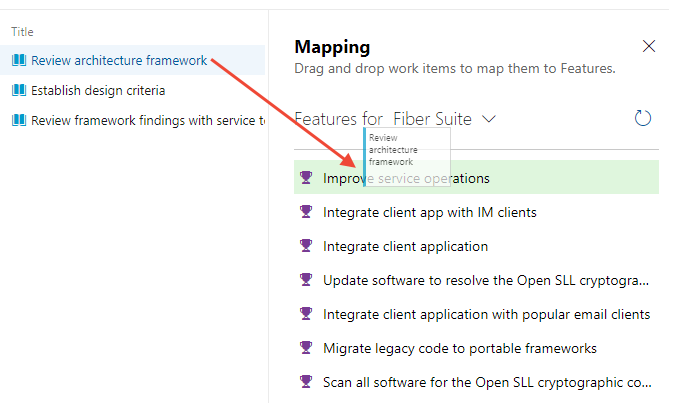
Use Azure Boards to group your requirements by features or business objectives. Utilize portfolio work item types, portfolio backlogs and boards, and the Mapping tool to link requirements to higher-level work items.
You can also use work item tags to group requirements in different ways.
Epics, features, and portfolio backlogs
Use parent-child links to create a hierarchy of requirements, features, and epics. Parent-child links are useful for organizations with multiple teams that want to see how their work contributes to overall goals and utilize portfolio planning tools.
With a hierarchy, you can manage a set of features that different teams work on. You can also view summaries of estimates, progress, and more on the product backlogs.
Group user stories under Features using Mapping
Use tags to group work items
Work item tags are labels that team members can add to work items. You can filter backlogs and boards by these tags to see only the matching work items. Tags can also be used in queries. For example, you can filter the board to see only the cards with the web tag.
Filter backlogs and boards based on tags

Use Kanban or Scrum
Azure Boards supports two major Agile methods: Kanban and Scrum. You can also use a hybrid approach like Scrumban that combines elements of both methods.
Use Kanban
Use a Kanban board to visualize your work items on a product or portfolio backlog. The board shows the work items that belong to your team, based on the area and iteration paths you choose.
You can customize your board to match your Kanban practices. For example, you can define columns and swimlanes, set WIP limits, and specify the Definition of Done. You can drag a work item to a different column to update its status as it moves through the stages of your workflow.
Example board

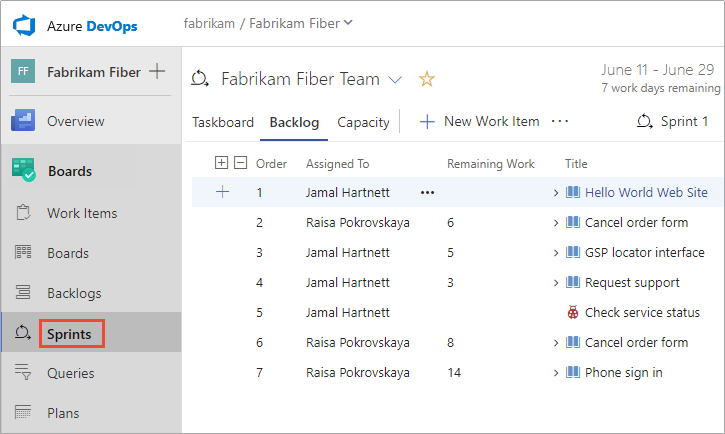
Use Scrum
Use a sprint backlog and Taskboard to view the work items your team planned for a specific sprint. Assign work items to a sprint by dragging and dropping them from your requirements backlog. Then, view them in a separate Sprint Backlog.
Example sprint backlog
For more information, see Plan and track your work.
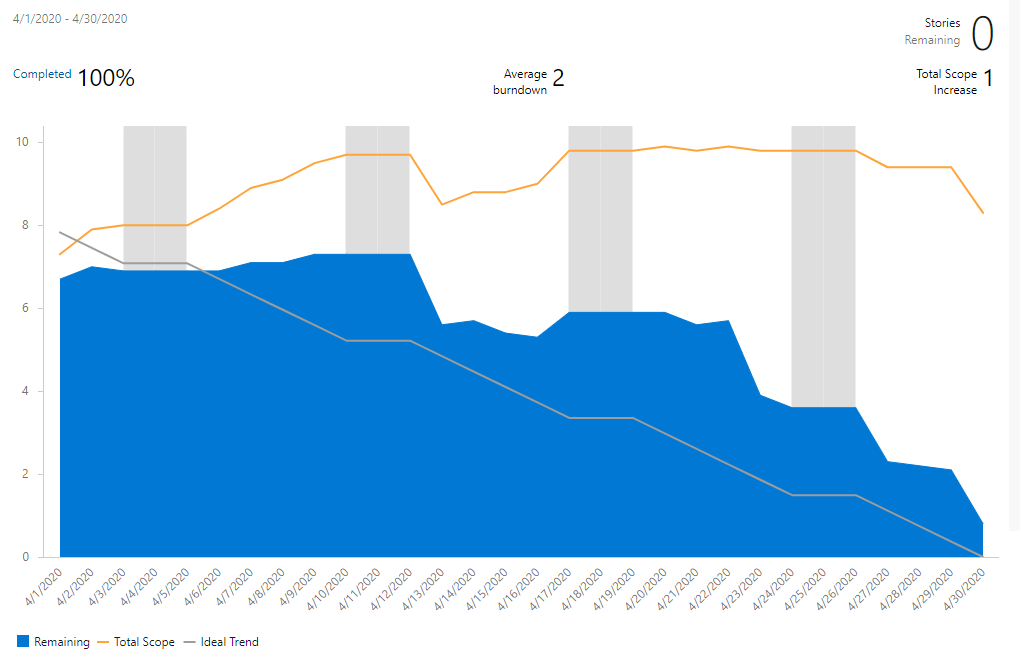
Sprint burndown chart
The Sprint burndown chart provides a daily update on your sprint's progress, showing the current work status, as illustrated in the following image.
Example Sprint burndown chart
Manage dependencies
In Microsoft Project, you manage task dependencies by linking them. In Azure Boards, link work items using the Predecessor/Successor link type. View link relationships using the Work Item Visualization Marketplace extension. The following image illustrates link relationships among several work items.
To see the full image, click the image to expand. Choose the ![]() close icon to close.
close icon to close.

Minimum Viable Product versus Critical Path Management
Azure Boards doesn't have a built-in way to show the critical path because Agile methods prefer a Minimum Viable Product (MVP) over Critical Path Management (CPM). With MVP, you find the shortest and most dependent path by ranking epics, features, stories, and tasks by importance.
Perform milestone planning
You can use team velocity and forecasting to plan when you can deliver your work.
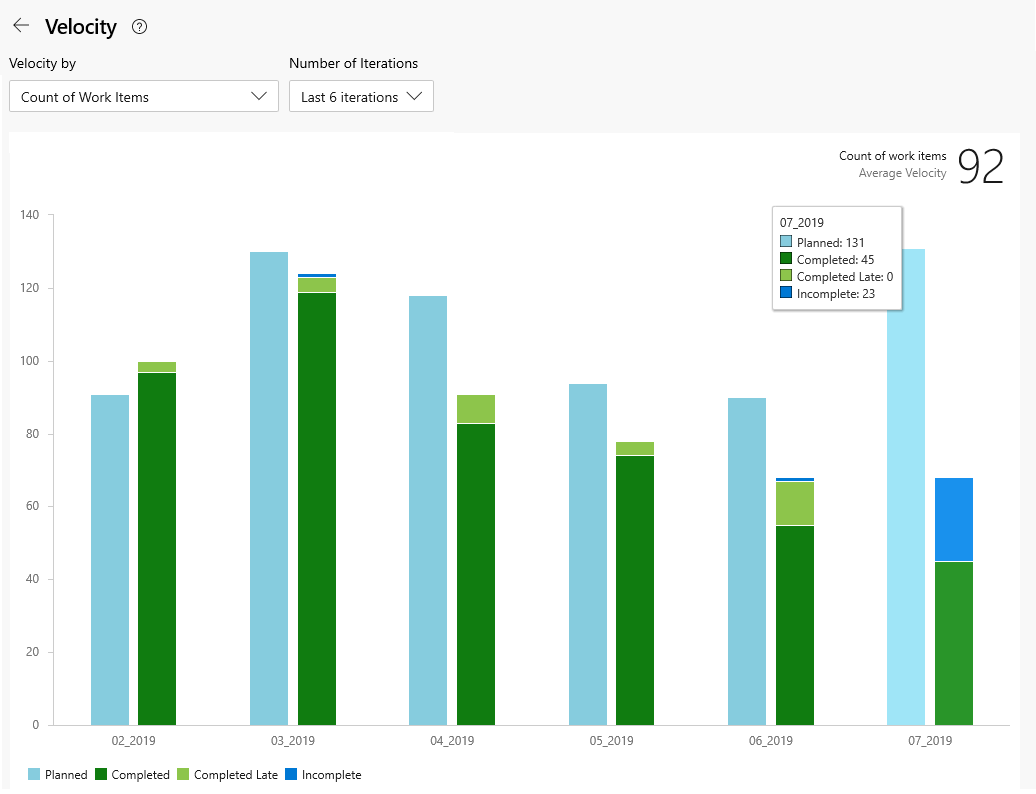
Team velocity
Working in sprints helps you understand your team’s velocity. Velocity shows how much work your team can finish in a sprint, based on the number or the size of the completed work items.
Example team Velocity chart
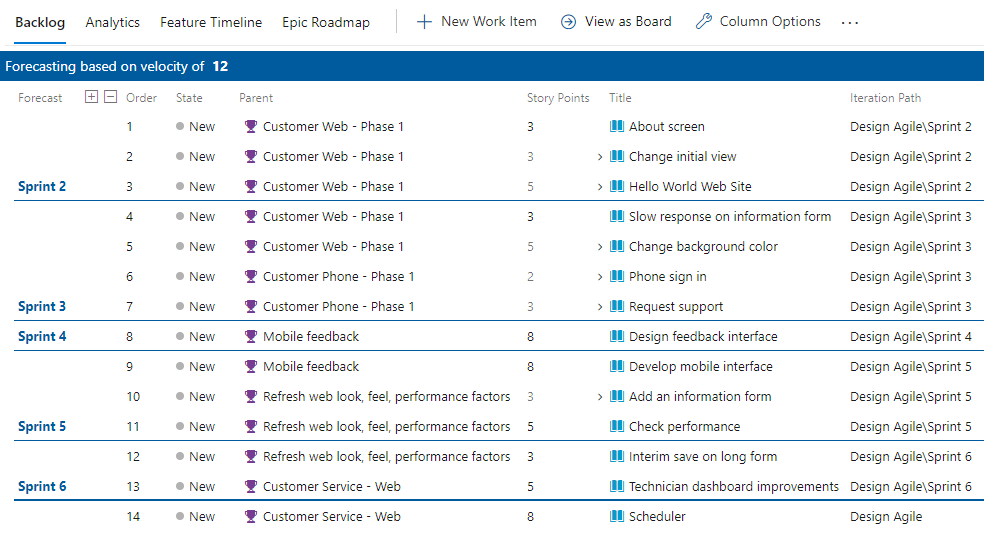
Forecast requirements
Use the Forecast tool to estimate Story Points, Effort, or Size for each requirement.
You can also set team velocity based on your estimates. For example, if you say your team can do 12 Story Points per sprint, the Forecast tool shows you which requirements and features you can finish in the next six sprints. You can use the Planning tool to assign requirements to the predicted sprints.
Example Forecast of requirements backlog
Use a Marketplace extension to integrate your requirements planning with Microsoft Project tools.
Milestone markers
Milestone markers aren't used in Azure Boards work tracking, except for Delivery Plans. Delivery Plans provide a calendar view and allow you to define a milestone marker.
You can use one or more of the following options to mark a work item as a milestone:
- Prepend or append the word Milestone in the title of your work item
- Add a work item tag labeled Milestone
- Add a custom field labeled Milestone and populate it with a pick list of milestones
- Link work items using the Predecessor/Successor or Related link type to a milestone work item
- Assign a milestone work item to the sprint targeted for completion.
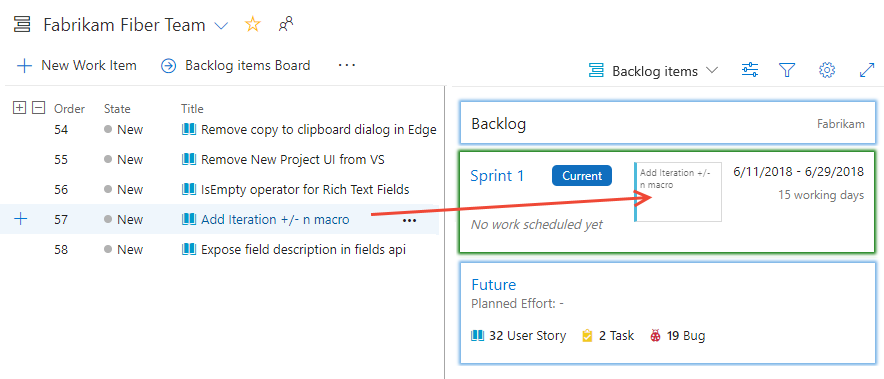
Assign requirements to timeboxes
You can quickly assign work items to a sprint through drag-and-drop from the product backlog to the sprint listed within the Planning pane.
Example assign requirements to sprints
Monitor and report on progress
To review progress and deliverables, you can use the following tools:
- Features board: Shows the status of each feature and its tasks
- Features backlog: Displays the rollup columns for the features and their child work items
- Delivery plans: Provides a timeline view of the features and their dependencies across different teams
Features board
You can also use your Features board to track progress and ensure the continuous delivery of value. The following image shows an example of a customized Features board with added columns for different stages of feature development, such as Need more info, Spec Complete, In Progress, and Customer Rollout. These columns reflect the natural flow of features from proposal to production.
Example of Features board with customized columns
To see the full image, click the image to expand. Choose the ![]() close icon to close.
close icon to close.

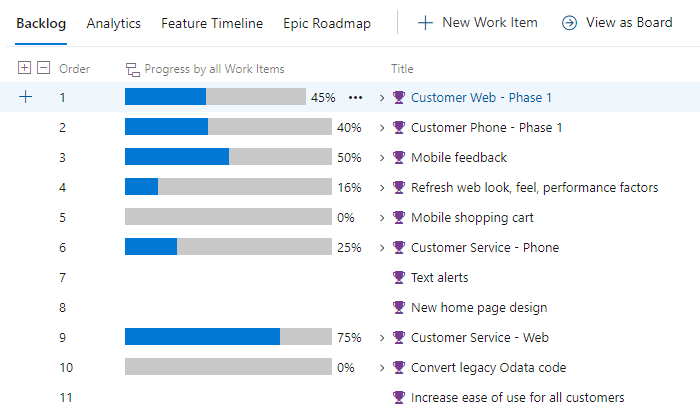
Rollup
The Features backlog offers a quick and visual way to monitor progress. You can add the rollup progress bar column to see the completion percentage of each feature’s work items. The following image shows how the column shows the progress of different features.
Example of Requirements backlog showing progress rollup
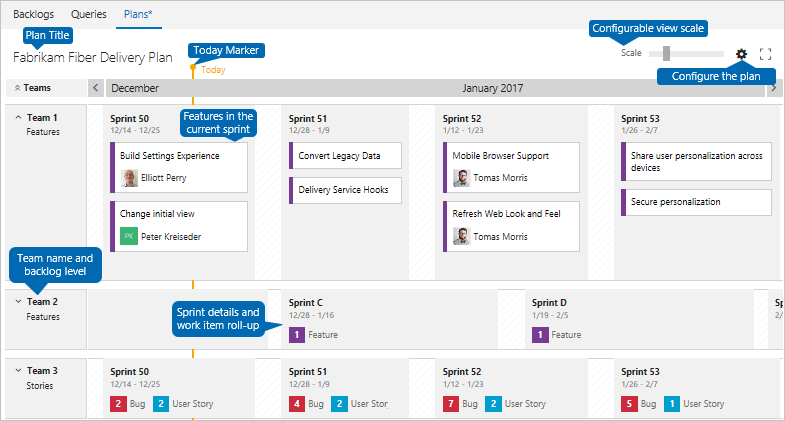
Delivery plans and multiple team deliverables
If you want to see the features that several teams are delivering across a timeline, you can set up a delivery plan. A delivery plan is an interactive board that shows a calendar view of the stories or features that different teams plan to deliver.
Example of multi-team delivery plan

Get notified of changes
Azure DevOps provides a robust alert system, where project members can set alerts for themselves, a team, or a project. As changes occur to work items, code reviews, source control files, and builds, you can receive email notifications.